Monday, November 28, 2016

Big Sale This Week, 11/29/16 through 12/4/16. Making Room for New Inventory

 This week's Bitsy Nest sale includes all items in the 
Sale and Bitsy Things Section

Sale starts 11/29/16 (at 1:00 am), ends 12/4/16 
Items will be marked 30-50% off original prices. 
Items on sale include, miniatures, fairy garden accessories, 
crafting supplies and more
Quantities are limited, these items will not 
be restocked. We are making room for lots of 
new inventory coming soon 

A Repurposed Vintage Shadow Box Turns Into A New Kitchen

The "Remodeled" New Kitchen

I found this old shadow box that looked a little beat up, but I instantly saw the new kitchen I needed for photos. Sometimes getting good pictures of new miniatures in my dollhouse can be tricky, depending on the light, room and object. I needed a bigger, brighter kitchen and saw it with this box and great Black and White Tiled Floor. 

I decided to keep the paint and see if it would work, it's working for me with the White appliance right now, but who knows what color it will be in the future. The shadow box was probably a diner or shop at one time because of the same entryway on the right. I thought it would make a great pantry. 

Here's what it the shadow box looked like when I brought it home

After cleaning the walls and floors, I cleaned out the fireplace and added the curtains. Next I added my appliances and cabinets (of course I moved them around in several different ways, several different times)
The coffee pot found it's spot right away. I added a backsplash behind
the sink and hung hand crocheted pot holders under the microwave.
A filled baker's rack fits perfectly next to the fridge, a tiny decorate shabby step ladder sits in front of the pantry door. A cute "hand drawn" turkey picture decorates the center island

Family pictures, recipes and a picture of home decorate the front of the fridge

I made chalkboard signs for the walls along with a couple vintage
ones for the top of the cabinets and decorated the fireplace with Thanksgiving cut outs. 
The pantry is still a work in progress, but a cute Blue shelf holds some groceries, a broom and
feather duster also help decorate the space. 
A pretty fern and soft White Eyelet curtains brought helped bring the little kitchen back to life. Now it's a sunny bright spot perfect for picture taking and mini holiday decorating. 


Tuesday, November 22, 2016

Thanksgiving Sale Starts Today 11/22/16


Happy Thanksgiving! 
Everything in Bitsy Nest is on sale this week 
(11/22/16 through 11/27/16)
No coupon codes needed, sale starts at noon. 

Sunday, November 20, 2016

You Want A Dollhouse, But What One?


So you want a dollhouse, you've always wanted a dollhouse in fact, but...never had room for one, never had time for one, didn't know where to start. Well, maybe I can help a little. First you need to decide on the scale, do you want a 1:12 scale dollhouse, maybe smaller, 1:24 or even smaller. This was an easy decision for me...1:12 scale means if it's a foot it's a inch. Easy peasy...that was the one for me (not to mention, holding miniatures, even with tweezers can be tricky for big fat fingers). 

Okay, now you've decided on the scale, Where are you going to put your dollhouse? If you go with the 1:12 scale, you will have a pretty big house. Do you want to make your house, or buy it already assembled. For me, it was about the decorating, not the assembly so I went with a house already built, luckily I found one at a great price. Be patient they're out there, you just have to search. You may find one that needs new wallpaper, flooring or some minor fixing up. You can do it! Fixing a dollhouse isn't difficult, but keep in mind you do need patience (glue dries slowly when you're waiting and watching). Believe me when I tell you I'm not a patient person, but I do love crafting so if you can craft you can work on a dollhouse. 

Okay, are you ready to invest in that dollhouse? Not sure, do what I did, first a room or shadow box to see if you really love it. If you can't get it decorated fast enough and can't wait to change it the minute you've finished it, you're probably ready for something bigger. 


Still not sure, how about a small house with one or two rooms to try out. Maybe a tiny cottage...


This sweet little house has one large room and a tiny attic. It's been my flower shop, family room and now dining room. Perfect for making sure I wanted a dollhouse, small enough to sit on a side table and easy enough to change for holidays. Loved it, still love it, but, outgrew it quickly. So I knew I needed (and wanted) a bigger house. 

Maybe a small cottage is all you need. If you'd like a small cottage or one or two room dollhouse, be sure that the room or rooms can be what you want them to be. Do you want to decorate a kitchen, master bedroom or nursery? If so this type of house/cottage won't work for you. The windows and door placement in this small house limit the rooms you can create in it, but for me a shop, dining room or living room in this house work out perfect. 


Once you've decided you truly want that big dollhouse, have a plan in your head when shopping. What rooms do want your house to have. Do you need a dining room? Do you have to have a craft room or nursery? Can some of the rooms be a baby's room this year and a play room, den or game room next year? 

Of course there are a lot more questions like do you want electricity, do you want hardwood floors or carpeting, should you paint or use wallpaper, etc... but these are the fun ones that come after you decide on the type of house you want and where you'll put it. 

Have fun, create and always remember if you outgrow your dollhouse, have to move, want a new one or just need a new style, there will be someone out there who would love to have your dollhouse. 


Dollhouse Shadow Boxes

So now that my dollhouse is full and almost completely decorated, it's time to decorate shadow boxes (or get more dollhouses of course). The nice thing about shadow boxes is you can easily change them for the holidays or different room settings. Depending on what style you want that month. 


I purchased this shadow box already painted, with this fantastic built in fireplace. I'm not really in love with the floor though so I might be changing that soon. 


 The fireplace was easy to decorate in a matter of minutes I was happy with it. 


Right now I have simple White furniture in here along with a great hand braided rug. I made the tiny wall quilt on the left and added a Christmas tree and framed Christmas picture to the back corner. Under the window sits my favorite miniature birdcage with two tiny blue lovebirds perched on the top of the cage. 

The great shades on the window, really roll up. I'm working on getting these in the shop

Above the front door I hung a large White wreath I experimented on (not sure how I feel about it) and on the arm of the chair I have the tiny granny square I crocheted under the magnifying glass last week (wow is it tiny).
A vintage wood buffet table stands under the other windows (for now, may put a different table here soon) decorated with Christmas Cards and a pretty Poinsettia. Above the windows is a "It's the most wonderful time of the year" sign and a string of Christmas cards. 

That's it, my shadow box decorated for the holiday, but can quickly be changed for any season, holiday or occasion. 


Santa's Office, Dollhouse Miniatures in Lantern

You know you love miniatures when, you can always find a new place to display them. How about Santa's office in a lantern? 

I had a lantern (lots of them in fact) and a few miniatures (let's be honest lots of those too) that I wasn't using. So...I thought... I'll make Santa's office in here. 

First I added the brick wall and floor (scrapbook paper). Next I added the comfy armchair and small vintage wood hutch (I know it isn't a desk, but it fit perfectly in the lantern so a hutch it is). Next I made a "Welcome to the North Pole" Sign and got to work accessorizing. I hung Santa's coat from the side of the hutch, put his hat in the chair and decided he needed a vintage Saturday Evening Post to read, couldn't be just any copy, had to be one with a Santa Claus picture on the cover. Next I made the "Ho Ho Ho" blackboard sign and put it on top of the hutch along with a Poinsettia gift basket and some nice old books. 

Inside the hutch I added, wrapped presents, a vintage wood toy, a child's drawing, a December calendar page, mug with candy cane and a of course a naughty/nice list. Inside the drawer I added lots of letters to Santa and hung a tiny wreath on the other hutch door. 
I had a little bit of room left in the lantern so I added the slim Christmas tree and tiny toy sled. Still needed a little something...
pictures of the reindeer. Done, office in a lantern. 

Happy Holidays 


The Bitsy Nest A Big Girl's Dollhouse


So the kids are grown...and I play with miniatures (so fun). Now that Bitsy Nest has a large selection of dollhouse miniatures to choose from, I thought it was about time to share some of my miniature projects.
My Dollhouse

A work in progress (sort of a never ending project in fact). I was lucky enough to find this dollhouse at my local dollhouse shop (few and far between these days, only 90 in the United States in fact). Lots of space, already put together, wallpapered and wired. Ready to decorate :O). 

Sorry you can't see the front of the house in these pictures, there is a wrap around porch perfect for warm Spring nights, long chats and sweet tea drinking. I'll try to get pictures of the porch soon. 

The Kitchen

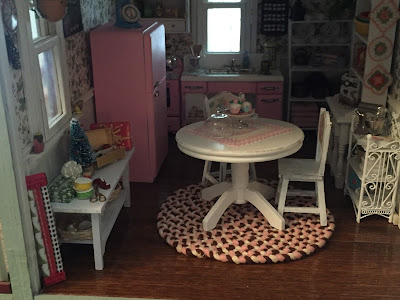
The first room I decorated was the kitchen. I'm definitely not a cook, but I do love vintage and quickly went to work painting a 1950's retro kitchen set for my kitchen. 


To help lighten my kitchen after painting the appliances, I distressed a round table and chair set and added Blue and Pink roses to the backs of the chairs. Love the little cottage, shabby chic look of them. 

In the corner of the kitchen I have a metal baker's rack filled with copper pots and pans, a vintage coffee grinder, a few dishes and a pretty fern (definitely looks a lot healthier then the ferns I try to grow). 

The newest additions to my kitchen include these precious hand crocheted pot holders. Inside the hutch are some food items along with brightly colored nesting bowls and dog treats.  I love these minis, and try to keep them stocked in the shop. 


A pretty plant in a terracotta pot hangs from the window near my refrigerator and under it is the perfect size side table, complete with a bottom shelf and storage baskets. The table is currently decorated with wrapping supplies and a tiny decorated Christmas tree. 

On the fridge is a Blue kitchen scale (another one of my favorite pieces). My "real" kitchen is filled with vintage scales, so this was a must have item for my dollhouse. 

The handmade braided Pink and Brown Rug under my kitchen table is also one of my favorite accessories. It moves from room to room depending on my mood. 


The kitchen table always has something new on it (don't all kitchen tables). Right now it holds a plate of cupcakes on a pretty glass domed cake stand. 


 The Foyer/Entry Way


To the right of the front door is a vintage mirror and hall table, I painted and distressed. It's the perfect place for your keys and purse when you walk in. The bottom shelf holds books today, but who knows what I'll put there tomorrow. 

I love birds and birdhouses, so this little distressed birdhouse on the hall table is another favorite mini of mine. 

Under the stairs to the left of the door is a hat/coat rack along with a vintage phone table, the perfect place to sit and put on your shoes. 


I've started decorating for Christmas (slowly but surely). The garland is on the staircases and fireplaces. 
The Living Room

My dollhouse came with two built in fireplaces, one here in the living room and another in the master bedroom.  To the left of the fireplace I hung vintage style framed bird pictures and added a pretty rose flower arrangement. Inside the fireplace (for now) site three pillar candles


I'm still trying to decide whether or not to paint them along with the buffet that holds my Blue birdcage (complete with Yellow Canary).


The Christmas tree has replaced my dining room set for the holidays, but I don't mind. The large hutch on the dining room wall was lots of fun to paint and distress. After it was finished I couldn't wait to add lots of pretty porcelain dishes. I'll be decorating it for Christmas this week though (I hope anyway).

The Master Bedroom

I painted and distressed a simple wood double bed, Blue and added a beautiful handmade bedding set in Pink. The bed is currently holding presents and the family Yorkie


Above the bed I hung a wall shelf and filled it with perfume bottles, tissues and a distressed bird picture. 

On the sides I hung two pretty oval floral pictures and hung a sweet handmade straw bag from the side hook. 


A beautiful handmade armoire sits next to the built in fireplace and in the corner sits the Yorkie's bed and leash. On the mantle I added pretty porcelain vases and a porcelain mantle clock


The dresser in the corner was also hand painted and the Blue couch next to it was found in a clearance bin. Love it! Its looks like the perfect to curl up with your favorite book or knit


The Craft Room

This room goes through lots of changes. Since vintage knitting and sewing items are another favorite collectible of mine, I've had this room filled with them off and on. Currently my sewing machine is in storage to show off the sweet handmade couch and pillow under the window another cozy place to knit, crochet or read a good book. 


The fabric filled cabinet was a birthday gift from my husband and the ironing board was a handmade piece I couldn't walk away from. I love the birdhouse, nest and pretty hydrangea. It sits under vintage advertising signs I made the first week I got the house. 


These stairs also have garland and sitting on the pretty trunk is one of my teeny airplants.
 The Bathroom

This room was done in no time. I wanted pretty, simple, porcelain bathroom pieces.


I added the tiny shelf above the toilet. It holds toilet tissue and tiny shampoo bottles

The pretty lace chair was another find off of a clearance table. All I had to do to bring it back to life was add pretty guest towels and put it under the sunny window. 


Across from the window, I added a vintage style dresser. On one side I added porcelain bathroom accessories and on the other side there is a tray complete with brush, comb and cosmetic jar. Inside the cabinet I hung a soft terry cloth robe. 


The Nursery

This room is nice and big and seems to be always changing and getting new additions.  The pretty canopy crib was one of the first dollhouse pieces I purchased. I couldn't resist the soft pink ribbons and tiny roses holding back the lacey canopy. 


On the left wall is the changing table, decorated with diapers and ointment. Above it is a simple white shelf filled with baby products. I made the sweet baby bird picture to the left of the shelf. 


Next to the crib sits a White wire rocking chair with a soft Pink blanket and a sweet teddy bear. 

In the basket beside the chair are three Dr. Seuss books that I remember reading at least a hundred times. 

The tiny bunting hanging from the staircase took me hours to make, but I love how it turned out. 


In the corner of the nursery sits a tiny walker decorated with a baby bottle and rattle. 

The White metal wardrobe matches the rocking chair and holds a handmade dress. Inside the drawer at the bottom I've stashed more tiny diapers. 

The tiny handmade doll in the gift box is one of the nursery's newest additions. 


The Guest Room

Right now the guest room is sort of my catch all room. It's another work in progress and I'm not sure if it will stay a guest room or not.

I added a pretty, single sized, dressed, White Bed and matching nightstand. Next to the bed are sweet hand crocheted slippers and a filled blanket chest. 


Opposite the bed I added a white vanity, mirror and pretty Rose pattern armchair. 


I think that covers all the rooms in my dollhouse, like I said before, it's definitely a work in progress so I hope you'll stop back again to see what's new.